DEM Overview
Reporting of events is an important part of diagnostics. Learn how the DEM comes into play in this article
If you have stuck around long enough, you probably have already read our article What are DCM, DEM, DLT and DET (opens in a new tab). If not, it may serve as a good starting point on diagnostics. Today, we'll expand on an important diagnostics module, DEM (Diagnostic Event Manager).
So, what is the DEM, and why do we need it? Well, if you heard about DTC's (Diagnostic Trouble Codes), DEM is within reach. It allows you to define and report diagnostic events, that you can later use to diagnose your ECU for problems. It interacts with the DCM (Diagnostics Communication Manager), providing fault information, aka DTC's (you can learn more about the communication of diagnostics by checking our article UDS Overview (opens in a new tab)). So, for example, after a long ride, you can just read the fault memory provided by the DEM and learn about everything going wrong with your ECU. This makes diagnosing issues less of a headache, as all you need to do is read a few bytes (at least for what the ECU can detect).
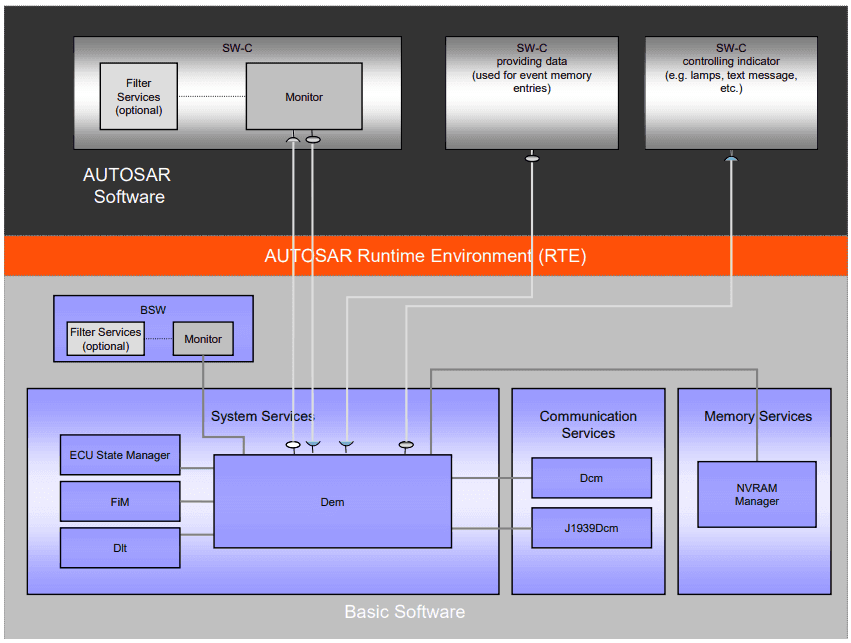
The DEM relies heavily on other modules for its functionality. Let's analyze how other modules come into play. Starting with the obvious:
-
RTE / Software Components - The diagnostics can come from anywhere in the source code. So, it provides ports for Software Components, receiving the event statuses from them and handing out the monitoring information it retrieves. Although the SW-C's make up a good part of the reports, other modules (including MCAL drivers) can do the same.
-
NvM (NvRAM Manager) - The event memory needs to be stored persistently, as the events reported to the DEM are often relevant even after a few power cycles. So, the NvM comes into play, to store the blocks needed by the DEM.
-
DCM / J1939 DCM - If you ever heard about reading DTC's and read our article on UDS, this is obvious to you. If not, let's put it this way: the DCM is the backdoor to all things diagnostics on a production vehicle, so, if you need to get the events reported to the outside world, you can do it through a series of UDS commands. You can even manage the fault memory, clearing it, for example. This is useful, if, for example, after fixing a problem in a vehicle.
-
EcuM (ECU State Manager) - The usual suspect, responsible for initializing BSW modules. You can learn more about mode management and the ECU state machine here, in our article .
-
DLT (Diagnostic Log and Trace) - The DLT is a logging module that allows you to know what is going on with the DEM, by providing that information through your preferred communication bus.
-
FiM (Function Inhibition Manager) - When certain events are reported as failed, the ECU should react accordingly, by disabling some functionalities. The FiM module monitors these statuses and inhibits some functionalities until the conditions are not verified anymore and it's considered safe to perform normal operation.
You can take a look at all the connections with the other modules here:

DEM dependencies with other modules, as per Autosar Specification
Before we finish, let's at least take a look at how the events in the DEM can be reported and how to report them properly, by checking the debounce mechanisms available for the events.
DEM events can either have the status PASSED or FAILED, or the intermediate states PREPASSED and PREFAILED, if you are using debounce (more on that later). Events can be reported / read in two different ways: through API's or ports, depending on the Autosar layer we are in. The get and set event API's are defined as below:
    Std_ReturnType Dem_SetEventStatus(
        Dem_EventIdType EventId,
        Dem_EventStatusType EventStatus
    )

    Std_ReturnType Dem_GetEventStatus(
        Dem_EventIdType EventId,
        Dem_UdsStatusByteType* EventStatusByte
    )
Keep in mind, there are way more API's (and ports, as Software Components can also access the DEM through the RTE) that the DEM provides and are useful. We are just scratching the surface today, but it's something we'll explore more in the future.
Now, let's talk about event debouncing: why do we need it and what options are there for us? Well, let's look at the simplest example. In your microcontroller classes in university, you are likely to have implemented a time-based debounce mechanism for a button. In the very least, electronics are not perfect. They are subject to interference. In automotive vehicles, this is no exception. Of course, if DEM implements this for us, we don't have to do it manually, which is awesome. So, debouncing is important. With that said, there are 3 different options for debouncing:
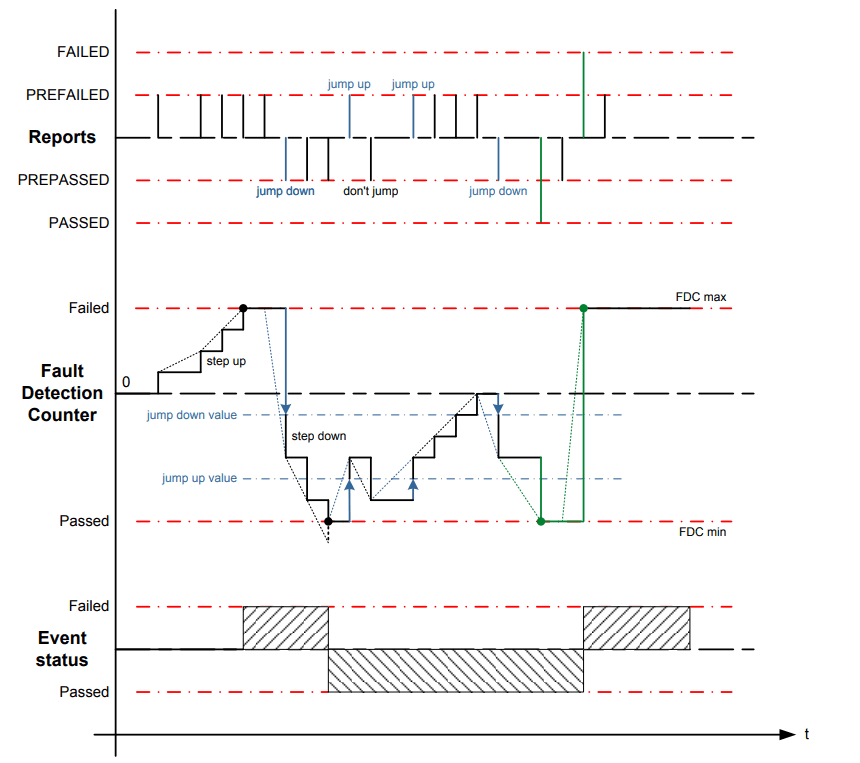
- Counter Based Debouncing - In counter based debouncing, every time you set an event to PREPASSED or PREFAILED, you are increasing / decreasing a counter by a number of steps. After a certain threshold is reached, the event is debounced as FAILED or PASSED. Whenever you are on the FAILED or PASSED state, an opposite event report can trigger a bigger jump, through a jump up or jump down value, if this option is configured.

DEM counter based debouncing, as per Autosar Specification
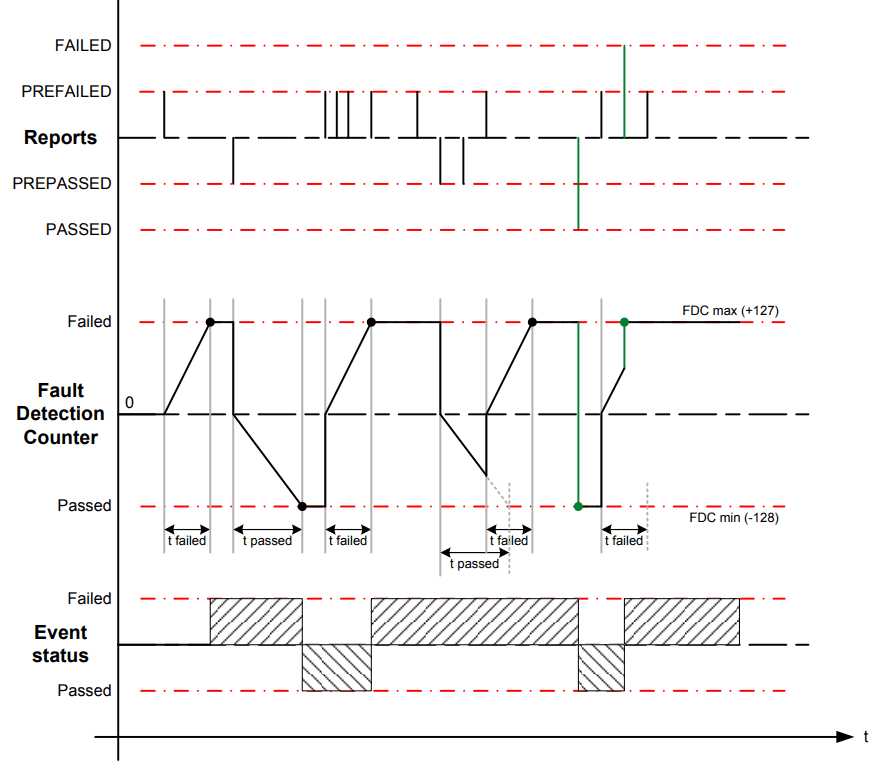
- Time Based Debouncing - Works in a similar way to counter based debouncing, but for time (are you serious here?). If an event is reported as PREPASSED or PREFAILED, after a certain time without an opposite event status, the event is automatically considered as PASSED or FAILED. One thing to keep in mind, by looking at the picture below, is that the events can be directly PASSED or FAILED, if you use those event statues instead of PREPASSED or PREFAILED.

DEM time based debouncing, as per Autosar Specification
- Internally Monitored Debouncing - in this debounce mode, you can take care of the debouncing yourself.
As some closing thoughts, we want to mention this is just a sratch in the surface. More will come in upcoming articles, where we'll have the opportunity to take a deeper look at the DEM and its surrounding modules, as there is a lot more to explore. Stay tuned!
Author: Micael Coutinho (opens in a new tab)
References:
© AutosarToday —@LinkedIn