How to Create Arxml for Software Components
Learn how to declare software components in Autosar and integrate them with the Autosar stack
So, if you are like me, you probably opened some xml files in the past and thought "ugh, what an ugly language". And the truth is, it's not the prettiest thing. But most often than not, you will find working with an UI and/or gathering an output from another app (Matlab does this sort of well, maybe we'll look at it someday), to make your life easier.
After what I said, you might be wondering, why do I need to learn something a few buttons and an automated tool can make for me? Well, here are a few reasons:
- Would you generate code that you do not understand to put in a vehicle?
- Generators are not going to give you everything perfectly right away. Yes, they will likely give you a head start, but you will also need to perform some changes yourself
- Even if you have a neat UI, do you understand what building blocks make part in a Software Component?
Not that I (hopefully) convinced you into doing things the right way, let's start. First, I encourage you to take a read on the articles Types of Software Components (opens in a new tab), Types of Interfaces and Ports (opens in a new tab) and Overview of Events (opens in a new tab), which will give you most of the theory behind the components you will learn to declare in order to build a fully functional SW-C. Second, we will not recommend a specific tool to create your Arxml files, because this will change with each company.
Some good practices before you start:
- Data types, interfaces from Autosar modules and some created by other SW-Cs will already be ready for you, either through your Autosar stack provider and other sources (we will pretend the latter case is not true, in order to learn more)
- You can divide your Arxml file into multiple files (one for data types, another for interfaces, and a main one would be a good rule of thumb, but you can have more if you want), as long as you import them in the correct order. An importer is the place where you select which Arxml files will be imported into your Autosar environment
Considering these practices, let's see our example! This is a very simple plant controller, adapted from the specification:
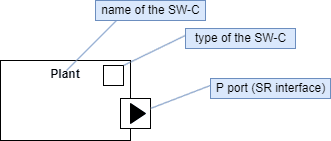
As you can see, this is a very rudimentary SW-C
We will not follow the 3 file unspoken rule, but focus on the essentials. We'll only scratch the surface, because this is an article, not a book. Future articles will focus on further details. So, the main file of your component can look like this:
  <APPLICATION-SW-COMPONENT-TYPE>
    <SHORT-NAME>Plant</SHORT-NAME>
    <PORTS>
        <P-PORT-PROTOTYPE>
            <SHORT-NAME>PlantTemperaturePPP</SHORT-NAME>
            <DESC>
                <L-2 L="EN">Port for sending out the estimated temperature of the
                plant</L-2>
            </DESC>
            <PROVIDED-INTERFACE-TREF DEST="SENDER-RECEIVER-INTERFACE">
                /McInt/PortInterfaces/TemperatureSRIF
            </PROVIDED-INTERFACE-TREF>
        </P-PORT-PROTOTYPE>
    </PORTS>
    <INTERNAL-BEHAVIORS>
        <SWC-INTERNAL-BEHAVIOR>
            <SHORT-NAME>PlantInternalBehavior</SHORT-NAME>
            <DATA-TYPE-MAPPING-REFS>
                <DATA-TYPE-MAPPING-REF DEST="DATA-TYPE-MAPPING-SET">
                    /McInt/DataTypeMappings/DataTypeMappingSet
                </DATA-TYPE-MAPPING-REF>
            </DATA-TYPE-MAPPING-REFS>
            <EVENTS>
                <TIMING-EVENT>
                    <SHORT-NAME>plant100ms</SHORT-NAME>
                    <START-ON-EVENT-REF DEST="RUNNABLE-ENTITY">
                        /McInt/SwComponents/Plant/PlantInternalBehavior/plantRE
                    </START-ON-EVENT-REF>
                    <PERIOD>0.1</PERIOD>
                </TIMING-EVENT>
            </EVENTS>
            <RUNNABLES>
                <RUNNABLE-ENTITY>
                    <SHORT-NAME>plantRE</SHORT-NAME>
                    <DATA-WRITE-ACCESSS>
                        <VARIABLE-ACCESS>
                            <SHORT-NAME>DWA_PlantTemperature</SHORT-NAME>
                            <ACCESSED-VARIABLE>
                                <AUTOSAR-VARIABLE-IREF>
                                    <PORT-PROTOTYPE-REF DEST="P-PORT-PROTOTYPE">
                                        /McInt/SwComponents/Plant/PlantTemperaturePPP
                                    </PORT-PROTOTYPE-REF>
                                    <TARGET-DATA-PROTOTYPE-REF DEST="VARIABLE-DATA-PROTOTYPE">
                                        /McInt/PortInterfaces/TemperatureSRIF/T
                                    </TARGET-DATA-PROTOTYPE-REF>
                                </AUTOSAR-VARIABLE-IREF>
                            </ACCESSED-VARIABLE>
                        </VARIABLE-ACCESS>
                    </DATA-WRITE-ACCESSS>
                </RUNNABLE-ENTITY>
            </RUNNABLES>
        </SWC-INTERNAL-BEHAVIOR>
    </INTERNAL-BEHAVIORS>
  </APPLICATION-SW-COMPONENT-TYPE>
Now, let's see the main blocks here:
- APPLICATION-SW-COMPONENT-TYPE - the type of the software component we are declaring. It will not always look like this, depending on the component
- PORT - the ports of our SW-C. They contain prototypes of ports which we can use. These prototypes make use of interfaces that can be used by the corresponding port that will connect to us. In this case, we have a sender-receiver interface, which is used to pass data between components. For more information on interfaces, please read Types of Interfaces and Ports (opens in a new tab), where we also explain what the data type mapping reference is important here
- SWC-INTERNAL-BEHAVIOR - the behaviors of our SW-C, which will contain our runnable entities, that will be triggered by events, to be mapped on the RTE. The event here is time based, so it will run every 100ms. You can read more about events on Overview of Autosar Events (opens in a new tab), such as explaining the runnable entity associated with the event, and why it is so important for code generation.
Some of these parameters are mandatory, others will be present or absent depending on the type of SW-C. For example, a calibration SW-C will not have an internal behavior.
Lastly, those smaller blocks, they are partly "glue code", partly configuration. You don't need to go into all their nooks and crannies (we barely scratched the surface), but if you decide so, please check our other articles related to the topic.
Author: Micael Coutinho (opens in a new tab)
References:
- Software Component Template - Autosar Specification (opens in a new tab)
- Application Interfaces User Guide - Autosar Specification (opens in a new tab)
More from the author
© AutosarToday —@LinkedIn